Here we are again, with another integration on Order Desk.
I’m talking about Ecwid.
Now you can integrate this platform with Hoplix via Order desk!. We recommend you to read the article if you want to start your business with Print on Demand and Ecwid!
What is Ecwid?
The service’s audience is small and medium-sized enterprises. Beginners, professionals – it doesn’t matter. Ecwid provides a fair level of functionality combined with convenience and ease of use. There is no need to have programming and design skills. Everything is ready and optimally configured – simply add products, choose/adjust the necessary sales channels, organise your shop window in a clear interface and start trading.
On this platform you can test and sell up to 10 products for free – not bad for a start. For example, it could be 10 smartphones or cases, handmade products or something similar.
Ecwid offers three approaches to creating an online ecommerce shop. The first is to use a start-up site on Ecwid. The second – adding a catalogue to a separate site developed on another CMS, website builder or framework. The third is launching a real shop within popular social networks. With such a variety of scenarios, the service has the widest possible audience.
Ecwid attracts by its simplicity. The site can be assembled from ready-made blocks and visually configured. The catalogue can be added to a third-party resource by pasting in a code or widget and the social network shop is launched in a few clicks.
At the same time the service is flexible enough to support the work of very large projects – at an unlimited rate the number of products is not limited.
All these features make Ecwid a universal tool for the creation of online shops, which can be useful for both small businesses and large retailers.
Who uses Ecwid?
Small and medium-sized traders and entrepreneurs who wish to sell quickly on any website without hiring a developer.
How Ecwid works
Ecwid offers to cover all possible sales channels. You create a single shop window that can be used as a separate website, hosted on other portals or social networks and even distributed via your own mobile application. The functionality will work in the same way on any platform:
- Product sheets with photos, descriptions, prices, bundling options.
- Shopping cart for checkout
- Payment of goods online
- Choice of shipping method
- Protect buyer’s personal information, including payment information
After registering on Ecwid you get a free start-up website. This is a one-page version with an embedded shop. All you have to do to start selling is change the photos and descriptions or change the design if you wish. The list of obligatory steps can be found in the configuration assistant, which opens when you first enter the control panel.
The minimum set of actions is as follows:
- Creating an account
- Launching the shop
- Adding products. There are examples in the catalogue, you can delete or modify them
- Checking the geographical settings. In addition to the country, you must select the currency and weight unit
- Setting delivery methods
- Setting up payment acceptance methods
It is possible to do without the configuration assistant. The control panel offers a very simple structure:
- “Store management” section. It includes tools for managing sales, the catalogue and promotion. There is also a tab with reports on the work of the shop.
- The “Sales channels” section offers the possibility of setting up different variants for distributing goods: via other sites, social networks, marketplaces
- The “Configuration” section contains design, payment and delivery settings, as well as a link to the application shop to expand the basic functionality of the service
After configuring the basic site you select which other sales channels to use:
- Launch the shop on social networks: Instagram, Facebook
- Upload the goods to the most popular marketplaces: Amazon, Google Shopping, eBay
- Place a product widget on the page of any website or add a shop window as a separate page
- Use the shop’s mobile application.
Orders from all channels are collected in a single Eswid administration panel. From here you can process and fulfil them, and then update the catalogue with product scales. The changes will be synchronised across all sales channels.
In addition to the sale of physical products and services, the platform allows the sale of digital goods to be organised: music, books, photos, videos. Ecwid provides hosting, so there is no need to look for other sites to store files. The file size depends on the hosting plan. The maximum available is 10 GB per file.
Design and models

Ecwid is not a website builder in the usual sense of the word. Placement of shops is possible on a native hosting subdomain – this is one of the options. The design is reduced to the parameters of the appearance and structure of the shop window, which will work wherever you integrate it. Overall, the appearance is good – the focus is on products, ergonomics and customer comfort.
You can customise the output format of the shop window in the “Configuration/Design” section. The following parameters are available:
- Image size – large, medium, small. The difference lies in the number of products that can be displayed on a single page. The large ones look more informative, but there is more space for the small ones. It is advisable to opt for “medium”.
- Image format – the aspect ratio of the product photos: 1:1, 4:3, 3:2, 3:4 and 2:3 Choose those that match the available illustrations, then everything will look good. You can also activate the background adjustment for pictures
- Product information – select the data fields to be displayed: title, price, article, purchase button, additional photos. All these can be aligned appropriately and a frame can be added around the images for contrast
- Product category names – select how product categories are displayed: in the image, under the image, with the mouse or hidden
- Product page layout: select the format of the shop window layout: 2 or 3 columns, product description on the left, right or under the image
- Product gallery display: choose the layout of the additional photos: horizontal, vertical or full screen. This setting significantly changes the perception of the shop window, check all options, choose the best one
- Product page information – choose the order and nature of the product details (title, item title, price, wholesale prices, description, quantity, “Share”/”Favourite” buttons, etc.).
- Catalogue customisation – possibility of setting the catalogue colour scheme according to the site, additional menu, navigation chain, sort field and login button if you wish to register before purchasing
With these settings you can build an adaptive shop window for your shop. The design is simple but functional. This allows you to add your shop window to any website and it will look very organic. If you need to adapt the design of the shop window in accordance with the stylistics of the website, then you can create your own CSS theme. As a result – Ecwid shops have a nice, clean and functional design by default.
Payment and shipping
Ecwid supports several payment methods for goods:
- Credit card. To implement this method you need to connect one of the available payment systems to the shop. In total in the list of supported services about 50 names For the connection of each payment system there is a detailed instruction in Ecwid knowledge base;
- Electronic money. The payment system is also required for processing;
- When setting up you can change the name of the method, add a note or detailed instructions;
- Bank transfer. Added manually in the section with offline payment methods. When editing, you write where to send the money or tell the customer how to get their details.
Once you have set up the payment methods, you have to select the shipping options. Ecwid allows you to create geographical zones with different shipping methods. For example, if the product is physically located in Rome, residents of that city have the option of picking it up in person. For buyers in other regions, self-pickup is not suitable, so it makes no sense to show it among the delivery methods.
It is also possible to prohibit delivery to certain areas. Attempting to deliver to an address in an inaccessible area will inform you that it is impossible.
You can choose between four strategies for calculating delivery rates:
- Automatic calculation – the rate is calculated by the company that will deliver the item
- Individual calculation – you can set your own rates based on product weight or order value
- Fixed rate – you can choose an average value and set it for all products
- Free shipping. The most common way is free shipping when you make a purchase above a certain amount.
The configuration of shipping is described in detail in the Ecwid knowledge base. The instructions help you to choose the appropriate options and set fair rates.
Mobile application for management
Already in the initial paid plan, shop owners have access to an Android and iOS application through which they can perform basic site management tasks:
- Add products along with photos, descriptions and prices
- Track inventory using the barcode scanning function
- Receive notifications of new purchases
- Process orders: change status, contact customer, accept payment
- Promote products and tell people about new promotions via social media using the Share function
- Generate discount coupons and manage bonus programmes.
The mobile application can be tried free of charge for 14 days. To have unlimited access to its use, you need to purchase one of Ecwid’s paid tariffs.
Marketing opportunities on the Ecwid platform
 Ecwid provides a solid space for product advertising. Both within the trading floor and on external services. Promotional campaigns on Google, Facebook, sales promotion with coupons, promotions and wholesale prices, cart abandonment with email reminders, use of retargeting to bring customers back to the shop, automatic mailings – all this arsenal will help increase sales. All data from your marketing activities are collected in detailed and easy-to-understand reports. You will be able to analyse the effectiveness of your advertising, correcting the course if necessary.
Sales channels
Ecwid’s main asset is its multi-channel sales capability. The service offers trading on Facebook and Facebook Messenger, Instagram, eBay, Amazon and Google Shopping. All these sales channels can be tracked from the mobile application. Integration is convenient, you don’t have to set up a separate storefront for each point of sale.
Format it correctly and then synchronise it with the right set of sites – it will be identical on each one. Changes will be adopted centrally for all synchronised sales channels – a big advantage. Manage the settings of a single shop, serving several outlets at once. Efficient.
There is also ShopApp, an app you can use to sell your products to iOS and Android users. Not to be confused with the shop management app – they are two different products. We are now talking about an additional sales channel. Your shop will have a branded app, which in itself is usually expensive. Again, it is not free: if you pay Unlimited for a year in advance, you will get it in about a month by submitting an application to the developers (they will do this individually).
Ecwid optimisation for Google
Ecwid has a sufficient standard set of tools for optimising pages on search engines. It automatically generates the CNC of product pages from their titles, which can be edited manually on paid plans. A sitemap and robots.txt are also collected and updated automatically. Alt tags are automatically generated for all images, as are meta tags for each product (title and description). It is possible to set the display of links in search engines, as well as not allowing the site to be indexed manually.
Ecwid uses Schema.org’s micro-parsing, adding it automatically to all pages. The platform is written in JavaScript, so the code embedded in the sites does not contain product data, everything is pulled in on the fly as the page loads, which allows the shop to be integrated almost anywhere. Search engines find it difficult to index such information, so Ecwid creates static HTML copies of the category/goods pages and allows them to be indexed by search engines.
Links have also been optimised, the characteristic part of which for JavaScript is the “#! – hashbench, which negatively affects the perception, the readability of links. In Equid we got rid of this prefix, the links look clear and beautiful. For the start-up site, you can link your own domain and SSL security certificate – important factors that influence the ranking and trust of your shop visitors. Synchronising the site with Google Analytics ensures accurate statistics for analysis.
Customer reviews and product ratings also play an important role in promotion. You can get additional feedback through some store apps such as Trustami and HelpfulCrowd. Also use the social media “Share” buttons on the shop window and in the product card dashboard – from here you can also send product data to Twitter and Facebook. Well, in general, all your sales channels are essentially links to the main one, the start-up shop. The more you talk about the shop on the web, the better.
Ecwid costs

Ecwid can be used free of charge to publish 10 products on the start-up site. Technical support by post. Possibility of integrating your showcase into other websites. Paid plans offer more functionality. If you pay a year in advance, their monthly price is considerably lower. Monthly prices and their descriptions
- Venture €15.00/month (€12.50/month annual fee) – unlimited traffic and number of storefronts, 100 products, no commission on sales, shops in Facebook/Instagram, Site Management Application for Android/iOS, download of digital goods files up to 25 GB, advanced SEO and marketing tools, access to all shop applications, technical support via live chat
- Business €35.00/month (€29.17/month annual fee) – 2500 goods, marketplace sales (eBay, Amazon, etc.), advanced marketing tools, delivery calculation by goods size, abandoned cart tracking, filtering of goods by properties, 2 customer accounts, technical support by phone and chat, 2 specialist hours to develop something non-standard for your site
- Unlimited €99.00/month (€82.50/month annual fee) – unlimited products and everything else, priority service, mobile application for customers, 12 hours to develop non-standard functionality for your site.
It’s all obvious: the more expensive the fee, the bigger the shop can be built and the more loyal customers can be attracted through marketing tools, additional sales channels and incentives. Barely a month is enough time to turn around and savour the benefits of trading with Ecwid. Try the platform for free and then sign a one-year lease. This e-commerce platform pays for itself quickly, if only because of the multichannel sales, because of the high number of transactions completed.
Conclusion
Ecwid’s capabilities are sufficient to effectively conduct e-commerce with a wide coverage of trading platforms. Practically everything is provided. What was not in the basic package will be available from the free shop applications. Everything is very good in terms of payment/delivery, merchandise transactions, marketing and statistics. Don’t forget the mobile apps – for shop management and for the customer side. In addition, you can take notes in the administration panel and make a to-do list.
You should mention separately the well-organised knowledge base which explains practically everything you can do with your Ecwid shop. Almost every section of the control panel has links to tutorials. Save your time – read them, there are many interesting nuances that will be useful to you and make your workflow more efficient.
Overall, the platform is a serious and versatile machine for selling conventional and digital goods. Closely integrated with many popular services. It opens up many perspectives.
Now we move on to explain Ecwid with works in order desk, and how it can be linked to other platforms like Hoplix for Print on Demand.
Ecwid integration with Order desk!

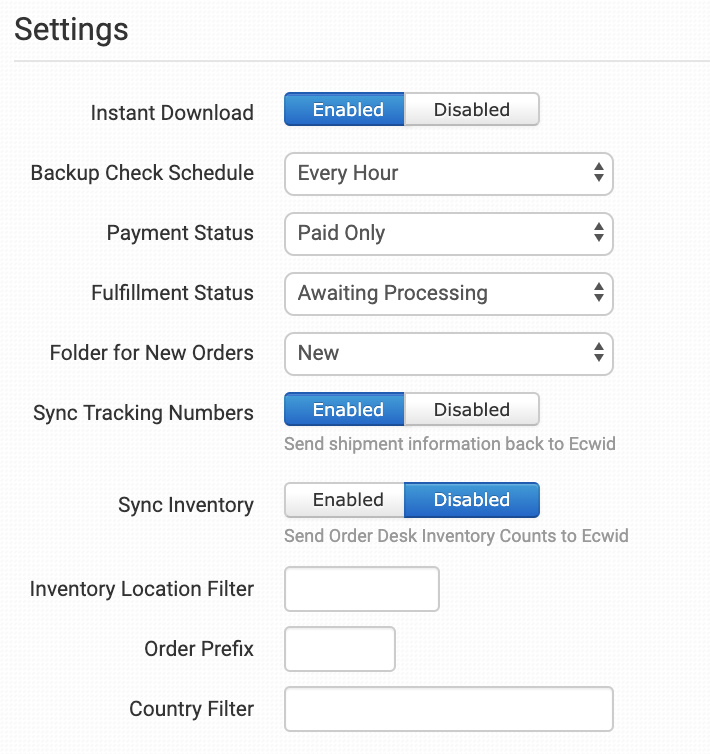
Merchants who have an online shop with Ecwid can use the Ecwid Order Desk integration to automatically import orders into Order Desk. This guide will review the Ecwid integration settings.
Set up
To connect to Ecwid, click the Manage Integrations link in the left sidebar and in the Shopping Cart tab find and enable the Ecwid integration.

Alternatively, search for Ecwid from the available integration search:

Once enabled, click on the Connect to Ecwid button to complete the connection. You will be prompted to log in to Ecwid from here.

Please note that Order Desk is not able to help you find or restore your credentials, as they can only be provided by Ecwid.

Instant Download
Enable instant download for your Ecwid orders to be imported into Order Desk as soon as they are entered.
Backup check schedule
The backup check schedule is a scheduled appointment to check Ecwid for any new orders. If instant download is enabled, the backup check schedule will run in the background in case orders have not been downloaded when they were placed. This can happen if the status of an order is initially incomplete or unpaid. The instant download will not be able to retrieve those orders immediately, but the backup control will find them after the status update.
If instant download is disabled, the backup control schedule can be used to place orders in the selected schedule.
Payment Status
Choose the Payment Status of the orders you want to bring to the Order Desk.
Fulfillment Status
Choose the Fulfillment Status of the orders you wish to bring into Order Desk.
Folder for new orders
Choose the folder in which you wish to add your new Ecwid orders as they are downloaded. The default folders in Order Desk are New, Prepared, Closed and Cancelled, however, you can create your own folders. For more information on how to use folders, see our Getting Started guide .
Sync Tracking Numbers
If Sync Tracking Numbers is enabled, Order Desk will automatically send shipment information to Ecwid and update orders there.
If disabled, tracking and fulfilment details will not be returned to Ecwid. If you prefer, you can send a shipment notification email from Order Desk to your customers, but your orders in Ecwid will have to be closed in another way.
Synchronize inventory
If you want Order Desk to synchronize the availability of your inventory on Ecwid, enable the Synchronize Inventory setting. Since inventory counts are updated here, Order Desk will send those numbers to Ecwid to update product availability there.
Inventory position filter
If you only want to download specific orders, you can use the Inventory Location Filter field to specify which ones you want. Enter multiple locations separated by a comma.
The name of the inventory location must exactly match the name of the inventory items in Order Desk. When importing new orders from Ecwid, Order Desk will review the SKUs on the items and compare them to the SKUs in your inventory here. Any orders with items for a location not listed in this field will not be imported.
For this to work, your inventory must be added to Order Desk. The inventory location must be set on each item. For details, see How to add inventory and How to store additional item details .
Order prefix
If you need your order numbers from Ecwid to have a prefix added, you can set the prefix here.
For example, order #1234 with the prefix EC- will enter Order Desk as order #EC-1234.
Country filter
If you only want to import orders that are shipped to certain countries, set the two-digit country abbreviations in the country filter with several countries separated by a comma. For example, if you only want to import orders for the USA and Canada, add US, CA to this field. Any country not listed will be skipped.
Leave this filter empty if you want to import all orders regardless of the shipping country.
Import orders manually

Orders will automatically start to be downloaded from Ecwid when integration is enabled, but if it is necessary to insert previous orders, this can be done with the Import orders manually button .
Ecwid has a limit that allows only 100 orders per page to be extracted manually. If you need to import a large number of orders, you can set Orders per page to 100, then set the Offset record to 100 and click the Import orders manually button . After entering the orders, if you have more to import, change the Offset record to 200, then 300, etc., until all your orders have been imported.
If you don’t have that many orders to enter, you can set a lower number of orders per page, such as the default 50, and set the record offset to the same number. If you need to import more, double the number of offset records and continue importing until all your orders have arrived at Order Desk.
Manually import inventory items
Order Desk can import all of your inventory items from Ecwid. To do this, click the Import Inventory Items Now button.


