
How to do Print on Demand with Etsy and Order Desk!
Here we are! Back with the Order Desk series and its additions di Hoplix!
Let’s start by talking about Etsy.
Read the article so you know what it is and what the benefits of Etsy are and then why start your business in Print on Demand with this integration and use the Hoplix service for your creations.
What is Etsy?
What is Etsy Shop? It is a real online marketplace, dedicated to artisans and creative people who want to sell their creations on the Internet. The main difference with other e-commerce platforms, is the following: on Etsy handicrafts are sold, and those who visit this website know for sure that they will find exactly these items.
Therefore, we are talking about an ideal platform for all people who are looking for original and unique products, and for those who want to sell them, monetizing their effort and effort: nothing could be easier, because Etsy allows anyone to create their own e-commerce, without spending money or wasting time learning how to make homemade e-commerce.
How does Etsy work?
Now that you know what Etsy is, you will definitely want to find out how it works. Let’s start with a necessary premise: you can only set up an e-store on Etsy to sell handmade or vintage, thus collectible, products. If you respond positively to these only stakes, you will only need to complete the registration to the site and start creating your e-commerce on this platform, all without having to pay anything. It should be noted, then, that the creation of your personal shop is a very simple operation, precisely because it is designed to be within the reach of anyone.
But is everything really free? No, because as is often the case with this type of site, you will have to pay a commission on the display of a product and its eventual sale: the right price to pay for a unique service in the network.
What are the advantages of Etsy?
The first advantage of Etsy concerns, first of all, the visibility of your handmade or vintage items: by creating a store on this platform, you have the mathematical certainty of finding lots of potential customers for your creations, precisely because Etsy exclusively allows the sale of this type of product. Turning to portals such as Amazon or eBay would cause your handicrafts to get lost among the mass of commercial and electronic products, while by creating your own e-commerce you would have to invest time, economic resources and energy to position it worthily on search engines such as Google.
Finally, Etsy boasts a really large community: in addition to the thousands of users who daily visit and buy on this platform, you can also count on a support forum always ready to answer your doubts and problems. What is Etsy, then? A perfect solution to turn your DIY passions into a secure income.
How to start your business on Etsy
If you have a creative, handmade project on your hands that you want to share with the world because you believe it could be a good opportunity for success, Etsy could give you a good chance to be able to increase your sales. But how to start your business on Etsy?
If you have no previous experience with this platform, it is possible that starting an Etsy store may seem like a rather complicated prospect. But in reality, opening an Etsy store is relatively simple and can give you the availability of an optimal showcase for your products, either alongside an existing website or e-commerce platform, or as your main online channel.
In order to guide you step by step through the journey of opening an Etsy store, we have structured the following points: read them all the way through and use the comments space to let us have your experience with this platform!
Now let’s get into the nitty-gritty and explain a few practical steps to create an etsy store and then how the integration with Order desk works!
Create an Etsy account
The first step in starting an Etsy store is simple: you need to create an account. You can create an account with Etsy by accessing the platform’s website and clicking on the appropriate registration link. Enter your e-mail, name and password and, finally, click on Register. You also have the option of creating an Etsy account through your Google or Facebook account. The operation will only take a few seconds of your time.
Set your store preferences
Next, you will need to set your default language, which is the language in which you will describe your items on Etsy (after you open your Etsy store, you can still choose to translate your page into other languages). Next, set your country of origin and the currency in which you would like to sell your items.
Choose the name of your Etsy store
From this point on, you’ll need to start unleashing your creativity: naming your Etsy store appropriately. Ideally, your store name should be intriguing but easy for customers to remember, and it should also reflect your products and values.
Choose a name of anything you’d like, as long as it falls within Etsy’s guidelines: 4 to 20 characters long, no spaces or special characters, must not already be in use by another Etsy seller, must not infringe on trademarks, and must not be flippant.
Add items to your store
The next step in starting an Etsy store is to add your items for sale. That said, listing physical and digital items involves separate processes. Either way, you will still need to:
- add photos: Etsy recommends using at least five photos per item so that customers can see your product from various angles and that the size of your images be at least 1,000 pixels square;
- adjust the thumbnail: The thumbnail is the first image of your item that your customers see in the store, via search, and beyond. Make sure it is quality and attractive;
- complete the details of your ad: give your article a title that describes the product in as much detail as possible, considering the 140-character limit. You will also have the opportunity to provide an in-depth description, a bulleted overview of the product, and additional details such as category and product type. In addition, take advantage of all 13 tags available for each item. Buyers can indeed find your item by searching for keywords in the search bar, and you should try to ask yourself what a customer might enter in the search box to discover your item in order to enhance the right keywords;
- Complete your inventory and pricing: enter the price of your product, sales tax (if applicable), quantity (if you have more than one in stock), and variations (if you offer more than one version of the same product, such as sizes, materials, or colors);
- set the shipping price: here, you will include all the necessary details about shipping processes, such as shipping services used, costs, country of origin, processing time, weight, and size of the item. Later, you will also have the ability to set up “shipping profiles” so you can quickly update items with the same shipping charges;
- publish your ad: you can preview your ad to see how it will look, before launching it live.
Choose your payment preferences
Once you have added your items, you will need to set your Etsy payment preferences. First, choose how you prefer to accept payments–between PayPal, check or money order, “other” or Etsy payments, which is the primary way sellers get paid. With this option, you can accept credit cards, debit cards, Etsy gift cards and more.
Currently, Etsy requires that any seller who is eligible (based on their location) to offer Etsy Payments… do so. As such, although Etsy used to offer PayPal as a standalone payment option, as of May 15, 2019, sellers in eligible countries, including the U.S., must use Etsy Payments with PayPal integrated, because PayPal’s standalone feature is no longer available.
Also, if you are eligible for Etsy Payments, you will need to set it up as part of your payment settings, entering your bank account and residential address to receive your payments directly from Etsy.
Set up billing information
When you start an Etsy store, this step will depend entirely on your country. In some countries, Etsy will require that you provide a credit card for identity authorization. You will also need a credit card so that Etsy can charge you for sales. In any case, the platform is able to guide you easily and, therefore, you will have no difficulty in setting up even this preliminary step to starting your store.
Open your store
Having finished all the preliminary steps we have outlined above, it’s time to experience your store live!
Customize your store
It’s not enough to have started an Etsy store: just like a “physical” store, your digital store needs to be easy to find, well-maintained, intuitively organized, and constantly updated. And here are some activities you should do in order to ensure your store is properly successful (or, at least, so we hope it is!):
- add a biography and photo: your public profile is the way site visitors can learn more about you, both as a business owner and as a person who has interests outside of your work. In your bio, you have the opportunity to tell your audience pretty much anything you want. Try to talk a little bit about your background, your interests, your qualifications, and tell what story is behind your products, your mission statement, and why you love what you do;
- set your policies: it is in this area of Etsy that you will answer any pertinent questions your customers may have about your manufacturing, processing, shipping, and payment processes. Be sure to include an estimated processing and shipping time so that your buyers have a clear idea of how long it will take for them to be able to receive the items you are selling. Also, be sure to include your returns and refund policy, and the payment methods you accept. If you have indicated “other” in your payment settings, you must now include information and instructions about that payment method in that section
- add sections: group your items into categories so that shoppers can sift through your products more easily. Somewhat like a navigation bar, sections will appear on the left side of your homepage and include the number of products within each category;
- rearrange your articles: obviously feel free to move your articles to the most appropriate place;
- add your store’s “about” section: plike your personal “about” section, your store deserves its own biography. You have 5,000 characters to tell customers your company’s story-keep in mind that Etsy (and customers) value transparency and openness, so don’t worry too much about using this section for SEO purposes. You can also list anyone who helps you produce and create your products or manage your store, provide photos and/or a video of your studio or creative process, and add links to your store’s social media profiles;
- use Etsy’s social media tool: advertise your Etsy store via social media, in a truly essential approach to expanding your business. Lucky for you, Etsy makes it really easy to do!
In short, we hope these brief tips will help you to improve your knowledge with Etsy. Now let’s talk about Etsy on Order desk.
How does Etsy work as an integration on Order Desk?
Etsy Integration – Order Desk

Order Desk can connect to your Etsy store and import your orders. As orders are processed, shipping notices can be sent back to Etsy.
This guide explains how to configure and use the Etsy integration in Order Desk.
Configuring the integration

Connect your Etsy account to Order Desk by clicking Manage Integrations in the Integrations menu in the left sidebar.
Select Etsy from the Shopping Carts section and click Enable.
Click Connect to Etsy and log in to your Etsy account. When prompted, authorize Order Desk to access your account and approve the connection by clicking Allow Access .
If your account has access to more than one store, you will be able to select which store you want to connect to Order Desk.
Once enabled, you can set your preferences in the Etsy integration settings.
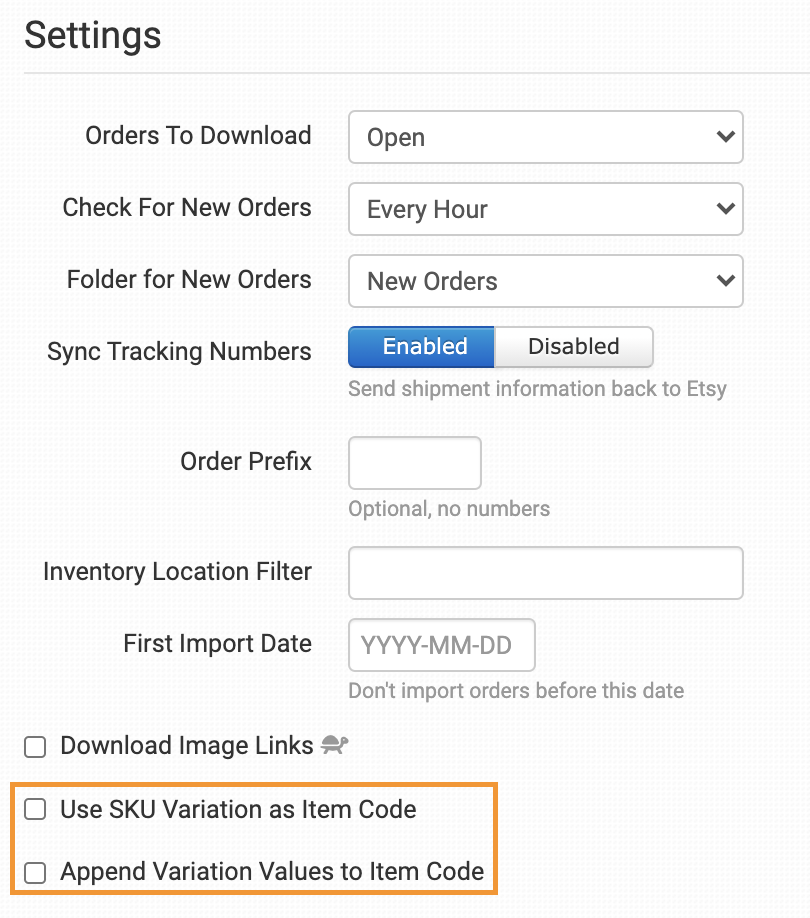
Orders to download
Choose the status of the orders you wish to download from Order Desk. The options are: Open, Not Shipped, Completed, Processing, All.
Check New Orders
Choose how often you would like to receive orders from Etsy. The options are: Never, Every day, Every twelve hours, Every six hours, Every two hours, Every hour.
Folder for new orders
Choose the folder where newly downloaded orders should be placed. If you do not want them downloaded to the New folder, you can create custom folders from the Store Settings page .
Synchronize tracking numbers
Order Desk can notify Etsy when a tracking number is added to a shipment. This will also trigger an email to the customer from Etsy. To enable it, select Enabled for the Synchronize Tracking Numbers option.
If more than one tracking number is added to an order, only the first tracking number will be synchronized with Etsy.
Order prefix
If you need to add a prefix to your Etsy orders as they download to Order Desk, set it here.
Inventory Location Filter
If you want to download only specific orders, you can use the Inventory Location Filter field to specify which ones you want. Enter multiple locations separated by a comma.
The name of the inventory location must exactly match that of the inventory items in Order Desk. When you import new orders from Etsy, Order Desk will review the SKUs on the items and compare them to the SKUs in your inventory here. Any orders with items for a location not listed in this field will not be imported.
For this to work, your inventory must be added to Order Desk. The inventory location must be set on each item. For details, see How to add inventory and How to store additional details on items .
Date of first import
Any orders prior to the date set here will not be imported into Order Desk.
Download Image Links
If you want product images to go into your orders, enable this option. A thumbnail of the image will appear next to the product in an order and a link to the image will be added to the item metadata in the order.
Item Code (SKU) Features
This section provides more details about item code options when working with Etsy integration. The Etsy listing ID will be used as the SKU for your products if no SKU is found.
We recommend that you create your own unique SKUs in Etsy, including a unique SKU for each variation of a product. This is especially important for print-on-demand items, so the correct artwork can be applied to each unique product or variation.
Use the SKU variation as the item code

Before Etsy allowed SKUs, this feature allowed you to set a SKU as a variation. Now it is easier to add a SKU directly to each variation in Etsy, so you may want to do this. To do this, when you add your variations, select the SKUs vary for each … option for your variations:
Be sure to add a unique SKU to each variation:

However, if you have a previous store from before SKUs were allowed or still need to use this feature in Order Desk for any reason, you can still use a variation you create in Etsy as an item code. To do this, select Create a new variation and call it SKU:
In the Name the option field , set your SKU:
Add variation values to the item code Item
If you have variations on your Etsy products, you can enable the Add Variation Values to Item Code feature to add the alphanumeric value of each variation to the listing ID when items arrive with your orders. This will give you a unique SKU for each individual product combination. For example, if you sell an item on Etsy with an ad ID of 123456 and it has two variations: size (Small or Large) and color (Black or White), the item codes would come into Order Desk as:
123456-Small-Black
123456-Large-Black
123456-Small-White
123456-Large-White
Manual Imports
You can manually import orders or inventory items from Etsy into Order Desk.

Manually import orders
When you perform a manual import of orders, by default, Order Desk will download the last 50 orders in an open state. Orders that have already been imported will be ignored.
Click Advanced Download to change the default settings and be able to search further back for the last 50 orders:
Enter the quantity of orders to offset your search. Order Desk will search all items after the amount you entered.
Manually import inventory items.
Click Request Product Download to download your Etsy products into Order Desk.
Click the View Inventory Items button to be directed to your inventory in Order Desk.
For more information on using inventory in Order Desk, refer to the guide to using inventory details .
If you want to get started with Etsy without using our integrations and you want to manually upload both products and orders we have created a guide which explains how to do it if If you still have doubts, do not hesitate to write to us at [email protected]
Maximize Your Etsy Sales with Hoplix’s Personalized Product Range
Integrating Hoplix with Etsy via Order Desk opens up a world of opportunities for offering a diverse range of personalized products. By expanding your product catalog, you can cater to various customer preferences and increase your sales potential.
Enhance your store’s appeal with personalized fashion accessories and jewelry, providing stylish options for your customers. For tech enthusiasts, PC accessories and smartphone accessories offer functional and customizable products.
Decorate living spaces with home accessories and decorative items, allowing customers to personalize their environments. Car accessories provide unique options for those looking to add a personal touch to their vehicles.
In professional settings, office stationery and health and safety products can be customized to reflect brand identity or personal preferences. Of course, personalized apparel remains a staple, offering versatile options for your Etsy store.
By leveraging Hoplix’s extensive range of customizable products through Order Desk integration, you can effectively expand your Etsy offerings, meet diverse customer needs, and enhance your brand’s presence in the marketplace.hoplix.com
Maximize Your Etsy Sales with Hoplix’s Personalized Product Range
Integrating Hoplix with Etsy via Order Desk opens up a world of opportunities for offering a diverse range of personalized products. By expanding your product catalog, you can cater to various customer preferences and increase your sales potential.
Enhance your store’s appeal with personalized fashion accessories and jewelry, providing stylish options for your customers. For tech enthusiasts, PC accessories and smartphone accessories offer functional and customizable products.
Decorate living spaces with home accessories and decorative items, allowing customers to personalize their environments. Car accessories provide unique options for those looking to add a personal touch to their vehicles.
In professional settings, office stationery and health and safety products can be customized to reflect brand identity or personal preferences. Of course, personalized apparel remains a staple, offering versatile options for your Etsy store.
By leveraging Hoplix’s extensive range of customizable products through Order Desk integration, you can effectively expand your Etsy offerings, meet diverse customer needs, and enhance your brand’s presence in the marketplace.